Top 10 Sterile Dressing Removal Techniques for Global Buyers?

Time:2026-06-07 Author:Madeline
0%

In the realm of medical care, the significance of proper wound management cannot be overstated. Effective "Sterile Dressing Removal Techniques" play a crucial role in preventing infections and promoting healing. According to a recent report by the World Health Organization, inadequate dressing removal can lead to a 30% increase in infection rates. This stark statistic underscores the need for healthcare professionals to adopt best practices in sterile dressing removal.

Challenges persist in executing these techniques correctly. Issues such as patient discomfort and the potential for damaging newly formed tissue are common pitfalls. Moreover, a survey by the Journal of Wound Care indicated that 50% of nurses lacked adequate training on sterile dressing removal methods, revealing an alarming gap in essential skills. These findings highlight a pressing need for training programs that focus on evidence-based techniques.

Innovative solutions and guidelines are emerging to enhance dressing removal processes. For instance, proper adhesive removal tools can minimize skin trauma and pain. As the healthcare industry evolves, the emphasis on refining "Sterile Dressing Removal Techniques" remains pivotal. Addressing these challenges is essential for improving patient outcomes and ensuring a high standard of care in wound management.

Top 10 Sterile Dressing Removal Techniques for Global Buyers?

Understanding the Importance of Sterile Dressing Removal Techniques

Sterile dressing removal techniques hold significant importance in healthcare. Proper removal minimizes the risk of infection and promotes healing. It’s crucial to follow guidelines to ensure safety. Healthcare professionals must be trained in these techniques. Knowledge of anatomy and wound care is essential. Each patient's situation can vary, requiring tailored approaches.

In practice, attention to detail is vital. Consider the type of dressing used. Some may adhere more firmly than others, making removal challenging. A gentle approach can prevent damage to healing tissue. It’s necessary to assess the wound condition before removal. Observing for signs of infection is critical. Practitioners should remain aware of their own biases and assumptions, as these can affect their judgment during procedures.

Patients often feel anxious about dressing changes. Open communication can ease their concerns. Sharing information about the process builds trust. Anticipating potential complications, like excessive pain or bleeding, is also wise. Evaluating outcomes after each dressing change allows for continuous improvement. Reflecting on what worked and what didn’t fosters a culture of learning.

Essential Tools for Effective Sterile Dressing Removal

Effective sterile dressing removal requires the right tools and techniques. Key instruments include: dressing forceps, sterile scissors, and adhesive remover. Each tool serves a unique purpose. Forceps help grip dressings securely. Scissors provide precision for cutting. Adhesive removers are vital for minimizing discomfort.

Using these tools correctly can be challenging. Some may struggle with using forceps effectively, leading to increased risk of contamination. Others may find it difficult to cut dressings without damaging the skin. Learning the correct technique takes practice. It's important to approach the process with care, focusing on both safety and comfort.

Consider the overall environment. A calm setting can ease anxiety for patients. Ensure the workspace is clean and organized. Improper workspace management may lead to misplaced tools or cross-contamination. Being aware of these factors is crucial for success in sterile dressing removal.

Step-by-Step Guide to Pain-Free Dressing Removal

Removing sterile dressings can be uncomfortable, yet it's vital for wound care. Following a proper technique can minimize pain and prevent irritation. Start by gathering your supplies: clean scissors or tweezers, gloves, and sterile saline. Wash your hands thoroughly. Wear gloves to maintain hygiene throughout the process.

Begin by dampening the dressing with sterile saline. This helps loosen any adhesive. Gently peel back one corner of the dressing. If it pulls too tightly, apply more saline. Take your time. Rushing can cause pain and damage to the healing skin.

During removal, keep the skin taut. This technique reduces resistance and eases the dressing off. If you notice bleeding or discomfort, pause and reassess your approach. Reflection is crucial. Consider whether you used enough saline or applied excessive force. Adjusting your technique may improve future dressing changes.

Best Practices for Maintaining Sterility During Dressing Changes

Maintaining sterility during dressing changes is critical in healthcare settings. Proper techniques help prevent infections at wound sites. Begin by ensuring the surrounding area is clean. Use an appropriate clean surface to lay out your tools. This reduces the risk of contamination. Keep all materials organized and within easy reach before you start. Preparation is key.

When removing dressings, take your time. Gently peel away the dressing from the skin. Avoid sudden movements. This can pull on the wound or cause discomfort. If the dressing sticks, consider using saline to moisten it. Always wear sterile gloves during the process. Change gloves if they become contaminated at any point. This enhances safety and sterility.

It's important to assess the condition of both the dressing and the wound. If you notice anything unusual, apply a fresh dressing promptly. After completing the change, dispose of all materials correctly. This includes gloves and any used dressings. Reflect on each process to improve. Implement lessons learned in future dressing changes. Continuous improvement is essential for maintaining high standards in care.

Common Mistakes to Avoid in Sterile Dressing Removal

When removing sterile dressings, many overlook critical steps. A common mistake is pulling the dressing too quickly. This can cause pain and damage to the wound. It’s essential to assess the adhesion level of the dressing before removal. Taking your time can prevent unnecessary trauma to sensitive areas.

Another frequent error is using improper hand hygiene. Clean hands are crucial to avoid infection. Many may underestimate the importance of washing hands thoroughly before the process. Additionally, not ensuring a sterile environment can introduce pathogens. Always check that the surrounding area is clean and free from contaminants.

Being mindful of how the dressing is oriented during removal can also be beneficial. Approaching the process from the right angle helps in minimizing discomfort. A gentle technique is preferred; yanking can lead to complications. Reflecting on these mistakes enhances the dressing removal experience and promotes healing.

Top 10 Sterile Dressing Removal Techniques for Global Buyers

Technique Description Common Mistakes Tips for Success
Gentle Pull Technique Gently pull the dressing away from the skin at a low angle. Pulling too fast can cause pain and skin damage. Maintain a steady hand and slow motion.
Moistening Technique Moisten the dressing with saline or sterile water before removal. Neglecting to moisten can lead to pulling of the skin. Use a sterile syringe to apply moisture evenly.
Peel Back Technique Peel back the dressing rather than lifting it straight up. Lifting straight can cause discomfort and damage. Always keep the dressing close to the skin.
Glove Use Use sterile gloves to prevent infection. Using unsterile hands increases infection risk. Change gloves if they become contaminated.
Swaying Technique Sway the dressing side to side to loosen adherence. Not swaying enough can result in discomfort. Ensure a full range of motion without jerking.
Timing Choose an appropriate time for dressing changes. Changing too early or late can hinder healing. Follow a pre-set schedule for dressing changes.
Positioning Position the patient comfortably for easy access. Poor positioning can lead to difficult removal. Use cushions or pillows for optimal positioning.
Patient Communication Explain the process to the patient beforehand. Lack of communication can create anxiety. Encourage questions and reassure the patient.
Inspection Inspect the area post-removal for any issues. Overlooking signs of infection can be dangerous. Document findings and report any concerns.
Waste Disposal Dispose of dressing materials correctly. Improper disposal can lead to contamination. Follow local protocols for biohazard waste.

FAQS

: Why is proper sterile dressing removal important?

: It minimizes infection risks and promotes healing in patients.

What should healthcare professionals be trained in?

They should have training in sterile dressing removal techniques and wound care.

How can anxiety during dressing changes be alleviated?

Open communication about the process can help ease patient concerns.

What to do if the dressing adheres too tightly?

Apply more sterile saline to loosen the adhesive before attempting removal.

What should you assess before dressing removal?

Check the wound condition for any signs of infection or complications.

Why is reflection important after dressing changes?

It helps identify what worked, what didn’t, and fosters continuous improvement.

What supplies are needed for a pain-free dressing removal?

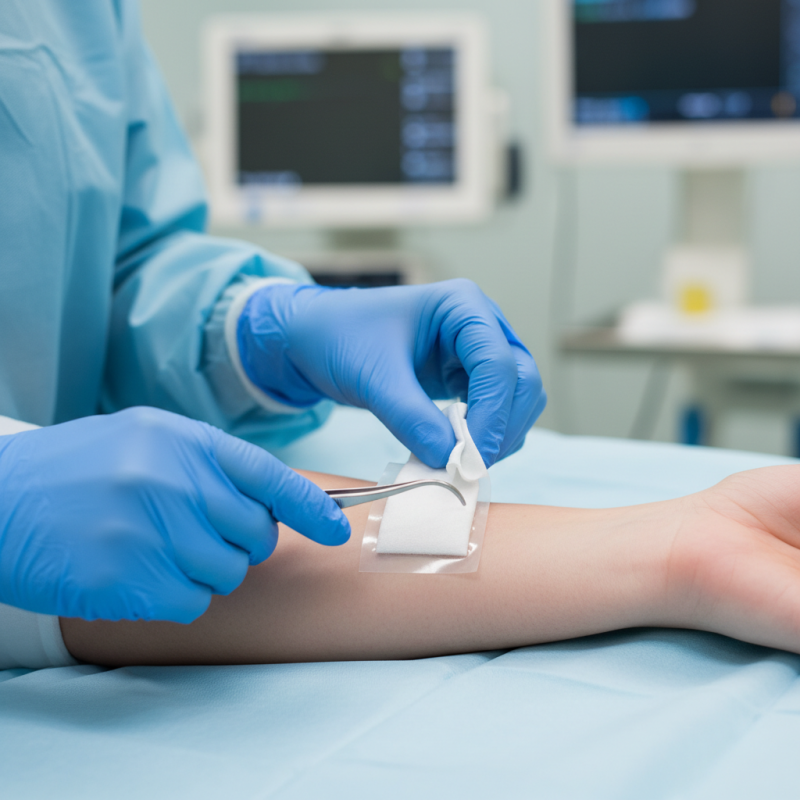
Use clean scissors or tweezers, gloves, and sterile saline.

How should one’s hands be prepared before dressing removal?

Hands should be washed thoroughly to maintain hygiene.

What technique can ease dressing removal?

Keeping the skin taut reduces resistance and makes the process easier.

What should you do if bleeding occurs during removal?

Pause and reassess your approach if bleeding or discomfort is noticed.

Conclusion

Sterile dressing removal techniques are crucial for effective wound care and patient comfort. Understanding these techniques and employing the right tools can significantly improve the dressing change process. Essential tools include sterile gloves, scissors, and adhesive removers, which aid in preventing infection and minimizing discomfort during removal.

A step-by-step guide to pain-free dressing removal emphasizes gentle techniques and patient communication, ensuring a smooth experience. Best practices for maintaining sterility focus on proper hand hygiene and workspace cleanliness, while common mistakes such as rushing the procedure or neglecting equipment sterility can lead to complications. By mastering these sterile dressing removal techniques, healthcare providers can enhance patient outcomes and promote healing effectively.

Madeline

Madeline

Madeline is a dedicated marketing professional with a wealth of expertise in our company's core offerings. With a keen understanding of the industry, she brings a unique perspective to her role, consistently delivering high-quality content that highlights the superior aspects of our products. As......